Logoff a user from a specific Session.
.DESCRIPTION
Uses the CSServer1 to send command to logoff user.
.PARAMETER sessionId
Active sessionId
.OUTPUTS
Uila_OK if sucess, otherwise PS error
.EXAMPLE
PS>.logoff_Session.ps1 -SessionId "Session/OTQwN2E4OWUtN2ZjNy00MTA2LWJhNGItYmQxNGFjMjkxZWFj/ZmEwNjk5MjktNmVlNi00NGQwLTk4MzgtNWUwY2VjNjYyMTNj/TVlEQVRBQ0VOVEVSXGN0YWkoY249cy0xLTUtMjEtMTk2NjcyNzM3OC0yNjk1MDI2NDQ4LTMyMDAyNTg2NjYtMTEyOCxjbj1mb3JlaWduc2VjdXJpdHlwcmluY2lwYWxzLGRjPXZkaSxkYz12bXdhcmUsZGM9aW50KS8zQGNuPTcxZTkxMzcxLWM2YzktNDZjMC04NmYzLTI4YjU2MGJiYTJhNixvdT1zZXJ2ZXJzLGRjPXZkaSxkYz12bXdhcmUsZGM9aW50LmNuPXZkaS1kZXNrdG9wLG91PXNlcnZlciBncm91cHMsZGM9dmRpLGRjPXZtd2FyZSxkYz1pbnQ6UENPSVA6MDpERVNLVE9Q"
#>
param (
[Parameter(Mandatory=$true)] [string]$sessionId
)
$sess = New-Object -TypeName VMware.Hv.SessionId -Property @{ Id = $sessionId }
$Global:HorizonServerServices.Session.Session_Logoff($sess)
Write-Output "Uila_OK"
Suspend a particular VM.
.DESCRIPTION
Uses the VIServer1 to send command to suspend a VM.
.PARAMETER vmName
Name of the VM
.OUTPUTS
Uila_OK if sucess, otherwise PS error
.EXAMPLE
PS>.suspend_VM.ps1 -vmName webserver
#>
param (
[Parameter(Mandatory=$true)] [string]$vmName
)
$vm = $(get-vm $vmName -server $Global:viserver1 -ErrorVariable ProcessError) 2>$null
if (!($ProcessError)) {
$res = $(suspend-vm -VM $vm -server $Global:viserver1 -confirm:$false -ErrorVariable ProcessError) 2>$null
}
if ($ProcessError) {
$res = $ProcessError -replace '[^x20-x7Ax09-x0C]+', ''
Write-Output $res
exit 1
}
else
{
Write-Output "Uila_OK"
}
Restart a particular VM.
.DESCRIPTION
Uses the VIServer1 to send command to restart the VM.
.PARAMETER vmName
Name of the VM
.OUTPUTS
Uila_OK if sucess, otherwise PS error
.EXAMPLE
PS>.restart_VM.ps1 -vmName webserver
#>
param (
[Parameter(Mandatory=$true)] [string]$vmName
)
if (!($ProcessError)) {
$res = $(Restart-VM -VM $vm -server $Global:viserver1 -confirm:$false -ErrorVariable ProcessError) 2>$null
}
if ($ProcessError) {
$res = $ProcessError -replace '[^x20-x7Ax09-x0C]+', ''
Write-Output $res
exit 1
}
else
{
Write-Output "Uila_OK"
}
Start up a particular VM that was previously powered off or put into maintenance mode.
.DESCRIPTION
Uses the VIServer1 to send command to power on and start a VM.
.PARAMETER vmName
Name of the VM
.OUTPUTS
Uila_OK if sucess, otherwise PS error
.EXAMPLE
PS>.start_VM.ps1 -vmName webserver
#>
param (
[Parameter(Mandatory=$true)] [string]$vmName
)
$vm = $(get-vm $vmName -server $Global:viserver1 -ErrorVariable ProcessError) 2>$null
if (!($ProcessError)) {
$res = $(Start-vm -VM $vm -confirm:$false -server $Global:viserver1 -ErrorVariable ProcessError) 2>$null
}
if ($ProcessError) {
$res = $ProcessError -replace '[^x20-x7Ax09-x0C]+', ''
Write-Output $res
exit 1
}
else
{
Write-Output "Uila_OK"
}
Power off a particular VM.
.DESCRIPTION
Uses the VIServer1 to send command to power off a VM.
.PARAMETER vmName
Name of the VM
.OUTPUTS
Uila_OK if sucess, otherwise PS error
.EXAMPLE
PS>.poweroff_VM.ps1 -vmName webserver
#>
param (
[Parameter(Mandatory=$true)] [string]$vmName
)
$vm = $(get-vm $vmName -server $Global:viserver1 -ErrorVariable ProcessError) 2>$null
if (!($ProcessError)) {
$res = $(Stop-vm -VM $vm -confirm:$false -server $Global:viserver1 -ErrorVariable ProcessError) 2>$null
}
if ($ProcessError) {
$res = $ProcessError -replace '[^x20-x7Ax09-x0C]+', ''
Write-Output $res
exit 1
}
else
{
Write-Output "Uila_OK"
}
Kill a process identified for a particular Session.
.DESCRIPTION
Uses the CSServer1 to send command to kill process command to the vdi desktop.
.PARAMETER sessionId
Session id
.PARAMETER processName
Name of the process
.PARAMETER processId
Porcess id
.PARAMETER createTime
creation time set for that process
.OUTPUTS
Uila_OK if sucess, otherwise PS error
.EXAMPLE
PS>.kill_Process.ps1 -SessionId "Session/OTQwN2E4OWUtN2ZjNy00MTA2LWJhNGItYmQxNGFjMjkxZWFj/ZmEwNjk5MjktNmVlNi00NGQwLTk4MzgtNWUwY2VjNjYyMTNj/TVlEQVRBQ0VOVEVSXGN0YWkoY249cy0xLTUtMjEtMTk2NjcyNzM3OC0yNjk1MDI2NDQ4LTMyMDAyNTg2NjYtMTEyOCxjbj1mb3JlaWduc2VjdXJpdHlwcmluY2lwYWxzLGRjPXZkaSxkYz12bXdhcmUsZGM9aW50KS8zQGNuPTcxZTkxMzcxLWM2YzktNDZjMC04NmYzLTI4YjU2MGJiYTJhNixvdT1zZXJ2ZXJzLGRjPXZkaSxkYz12bXdhcmUsZGM9aW50LmNuPXZkaS1kZXNrdG9wLG91PXNlcnZlciBncm91cHMsZGM9dmRpLGRjPXZtd2FyZSxkYz1pbnQ6UENPSVA6MDpERVNLVE9Q"
-processName "Notepad.exe" -processId 12232 -createTime 166543322
#>
param (
[Parameter(Mandatory=$true)] [string]$sessionId,
[Parameter(Mandatory=$true)] [String]$processName,
[Parameter(Mandatory=$true)] [ValidateRange("Positive")] [int]$processId,
[Parameter(Mandatory=$true)] [ValidateRange("Positive")] [int]$createTime
)
$sess = New-Object -TypeName VMware.Hv.SessionId -Property @{ Id = $sessionId }
$remoteBase = New-Object -TypeName VMware.Hv.RemoteProcessBase -Property @{ processId = $processId; name = $processName; CreateTime = $createTime }
$Global:HorizonServerServices.RemoteProcess.RemoteProcess_EndProcess($sess, $remoteBase)
Removed a Snapshot image info for a VM.
Uses Global variable $Global:viserver1.
.DESCRIPTION
Searches for the Snapshot from a previous query and then removes it
.PARAMETER vmName
Name of the VM
.PARAMETER snapShot
JSON description of the snapshot
.OUTPUTS
Uila_OK if sucess, otherwise PS error
.EXAMPLE
PS>.removeVM_Snapshot.ps1 -vmName webserver -snapShot "{
"Description": "For testing PS getting snapshots, can be deleted",
"SizeGB": 43.04,
"Name": "VM Snapshot 8%252f23%252f2021, 10:45:45 AM",
"Created": "2021-08-23T17:46:28.992129Z"
}"
#>
param (
[Parameter(Mandatory=$true)] [string]$vmName,
[Parameter(Mandatory=$true)] [string]$snapshot
)
$snapshotObject = $snapshot | ConvertFrom-Json
if (!($ProcessError)) {
$snap = $(Get-Snapshot -server $Global:viserver1 |
Where-Object {($_.Created -eq $snapshotObject.created) -and ($_.Name -eq $snapshotObject.Name)}) 2>$null
if ($snap) {
$res = $(Remove-Snapshot -Confirm:$false -server $Global:viserver1 -ErrorVariable ProcessError) 2>$null
}
}
if ($ProcessError) {
$res = $ProcessError -replace '[^x20-x7Ax09-x0C]+', ''
Write-Output $res
exit 1
}
else
{
Write-Output "Uila_OK"
}
Restart the guest OS for a particular VM.
.DESCRIPTION
Uses the VIServer1 to send command to restart the guest OS.
.PARAMETER vmName
Name of the VM
.OUTPUTS
Uila_OK if sucess, otherwise PS error
.EXAMPLE
PS>.restart_guestVM.ps1 -vmName webserver
#>
param (
[Parameter(Mandatory=$true)] [string]$vmName
)
$vm = $(get-vm $vmName -server $Global:viserver1 -ErrorVariable ProcessError) 2>$null
if (!($ProcessError)) {
$res = $(Restart-VMGuest -VM $vm -server $Global:viserver1 -confirm:$false -ErrorVariable ProcessError) 2>$null
}
if ($ProcessError) {
$res = $ProcessError -replace '[^x20-x7Ax09-x0C]+', ''
Write-Output $res
exit 1
}
else
{
Write-Output "Uila_OK"
}
Send command for VCenter to update the VMTools for a particular VM.
.DESCRIPTION
Uses the VIServer1 to send command to update vmtools in the VM.
.PARAMETER vmName
Name of the VM
.OUTPUTS
Uila_OK if sucess, otherwise PS error
.EXAMPLE
PS>.update_vmTools.ps1 -vmName webserver
#>
param (
[Parameter(Mandatory=$true)] [string]$vmName
)
$vm = $(get-vm $vmName -server $Global:viserver1 -ErrorVariable ProcessError) 2>$null
if (!($ProcessError)) {
$res = $(Update-Tools -VM $vm -server $Global:viserver1 -ErrorVariable ProcessError) 2>$null
}
if ($ProcessError) {
$res = $ProcessError -replace '[^x20-x7Ax09-x0C]+', ''
Write-Output $res
exit 1
}
else
{
Write-Output "Uila_OK"
}
Versions before v5.0 of Uila uObserve have reached end of service. Deployments running previous versions will no longer receive technical support from Uila or its partners.
Recommendation:

For versions before 4.0, while upgrading to v4.1 and above, you must first upgrade the Uila vIC, and then upgrade UMAS.
If you do attempt a software upgrade of more than a version build jump across 4.0, you need to take care of the sequence to avoid the issue. If run into issues, reboot the vIC.
Step by Step configuration for Windows 10 and Windows Server:
1. Create a normal user via the Active Directory Users and Computers tool.
2. Add the created user to following groups Performance Monitor Users and Distributed COM Users under Builtin.
3. Open a command prompt window and execute the wmimgmt.msc command.
4. Select the Properties of WMI Control (local).
5. Select the Security tab.
6. Select Root and press the Security button.
7. Add the group Performance Monitor Users.
8. Enable all Remote Enable, Execute Methods, Enable Account and all read rights.
9. Close the add dialog and select the group Performance Monitor Users in the list.
10. Select Advanced in the Security for Root dialog and then select the group and press Edit.
11. Select This namespace and subnamespaces to grant read-only access to the whole WMI tree to this account .
Configure the Windows Firewall (needed if the firewall blocks the remote WMI access)
1. Start the Windows Firewall using the Control Panel.
2. It is not necessary to use the Windows Firewall with Advanced Security control.
3. Select Allow a program or feature through Windows Firewall.
4. Open Component Services, Computers, My Computer and then Properties of My Computer.
5. Enable Windows Management Instrumentation (WMI) for Domain and/or Home/Work Networks.
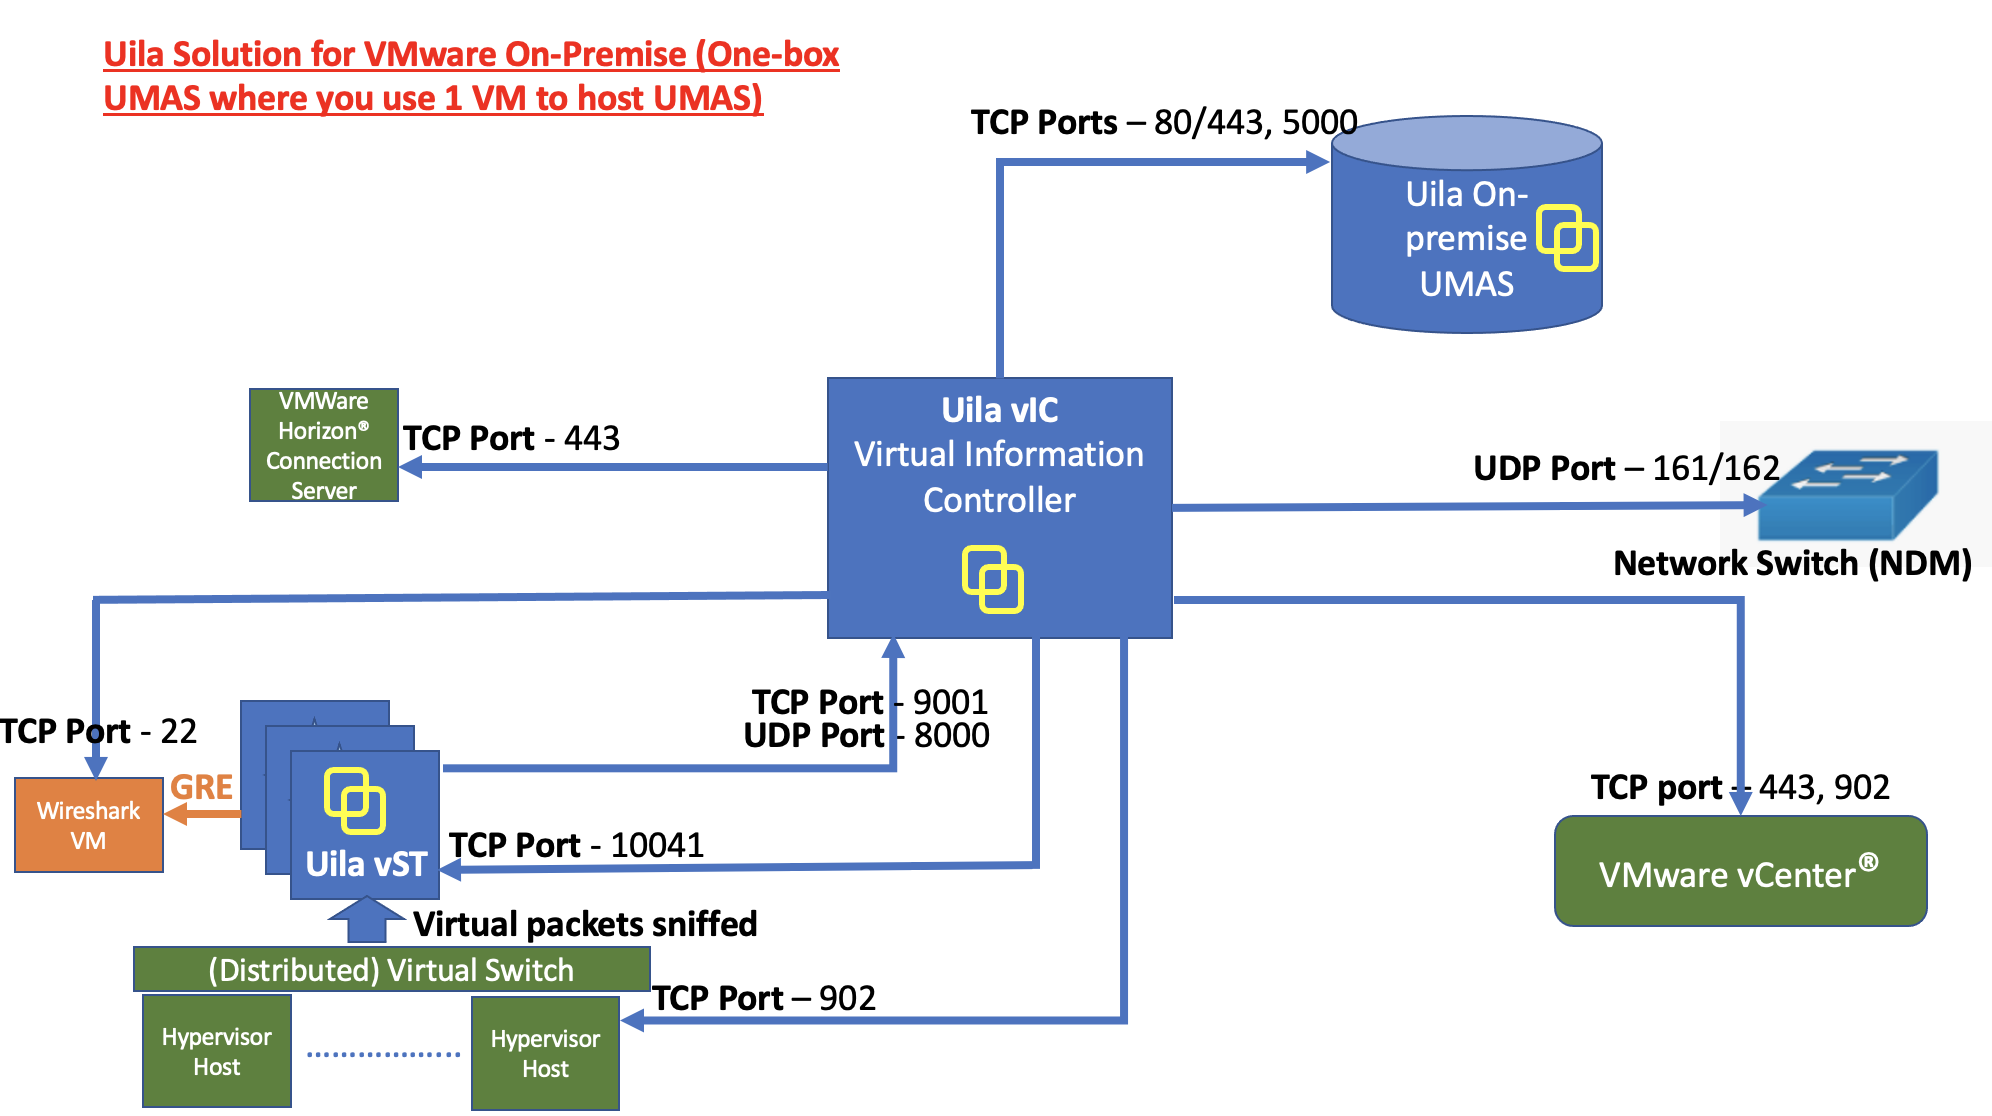
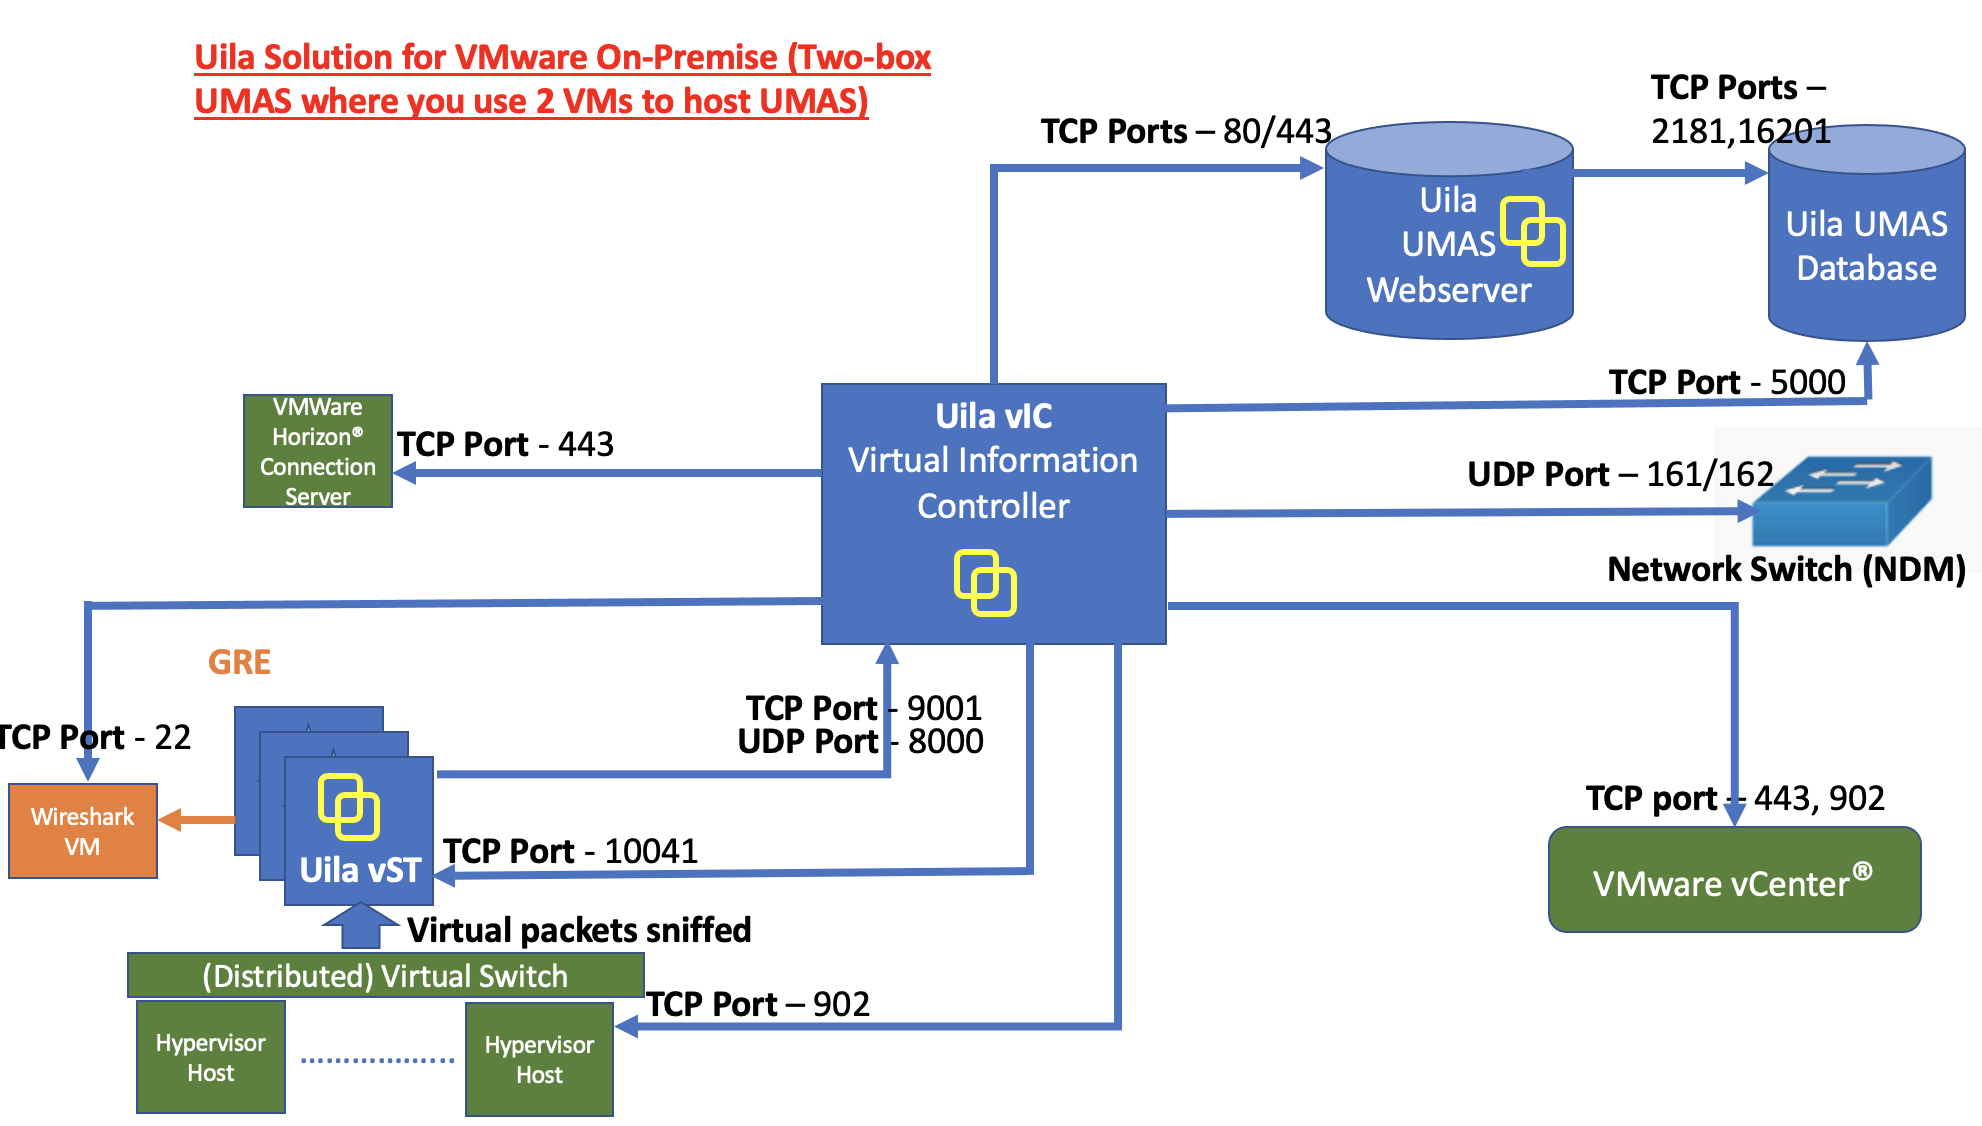
• On-Prem Server: For customer whose compliance policy prohibits the use of Public cloud service. It requires the installation of Uila server software inside your private data center.
1. Choose between AD or LDAP.
2.Make sure the Base DN is only using the Domain only For example: domain=uila.local, then it should be DC=uila, DC=local For example: domain=uila.com, then it should be DC=uila, DC=com distinguishedName: CN=Test,OU=AD-Test,OU=uilaEQRD,OU=UilaUsers,DC=uila,DC=com OU are the tree structured groups. The inner folder should be put in the front CN is the account itself.
3. An account with administrator privileges to fill in Admin DN is suggested. A complete distinguishedName is suggested, but if the AD/LDAP server has setup, then something like uila/admin can be used as well.
4.The import function is from the root folder, and since the domain has been set in the previous steps, so the syntax should start with the root folder without domain, which means it should starts with something like OU=xxxxx
5. if the customer wants to look for a more specific group, for example: the Domain Admins which is under root folder Uila Then OU=Domain Admins, OU=UIla can search the requested account. Select the required users to import and check the Datacenter which needs to be monitored.
Here is one full example:
Pick the first account for example: CN=XXX, OU=HELPDESK, OU=USERS, OU=UILA, OU=AllUila, DC=uila, DC=co, DC=us (Comman Name) (Organizational Unit) (Organizational Unit) (Organizational Unit) (Organizational Unit) AD domain (root node)
The OU text is what you need to input to base DN on our import account UI. If you want to get users belongs to "HELPDESK" you need to input "OU= HELPDESK,OU=USERS,OU=UILA,OU=Alluila" into the base DN on the UI.
If you want to get users belongs to the OU "USERS" you need to input "OU=USERS,OU=UILA,OU=Alluila" and so on.
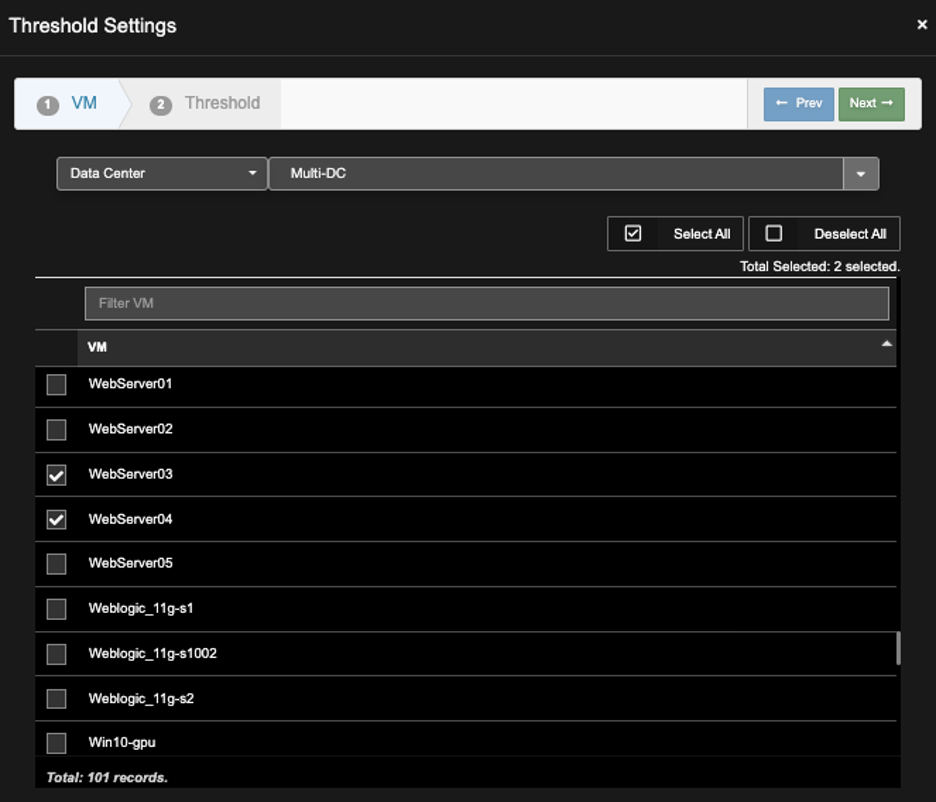
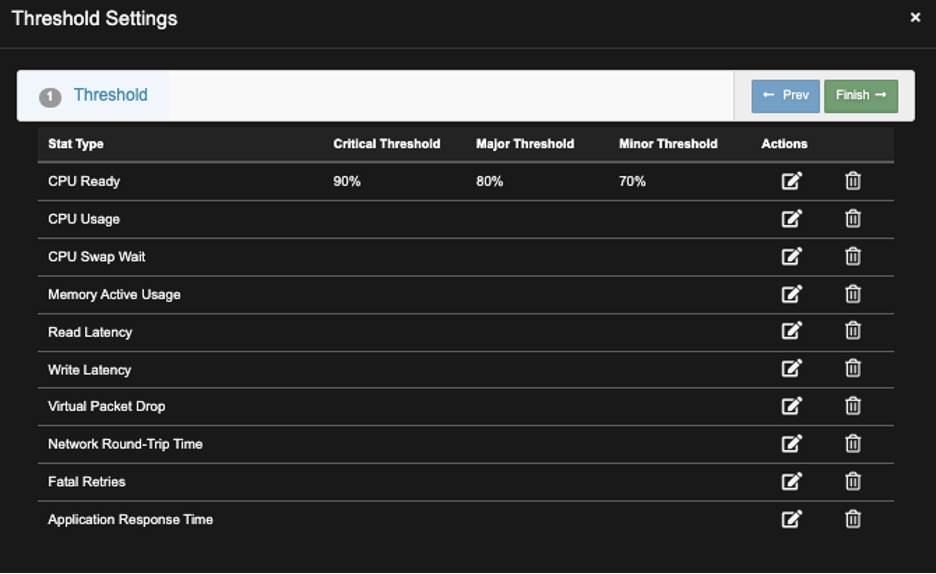
A) Go to Settings —>Alarm Configuration
B) Go to Threshold Settings, Select VM, and Click ‘New’.
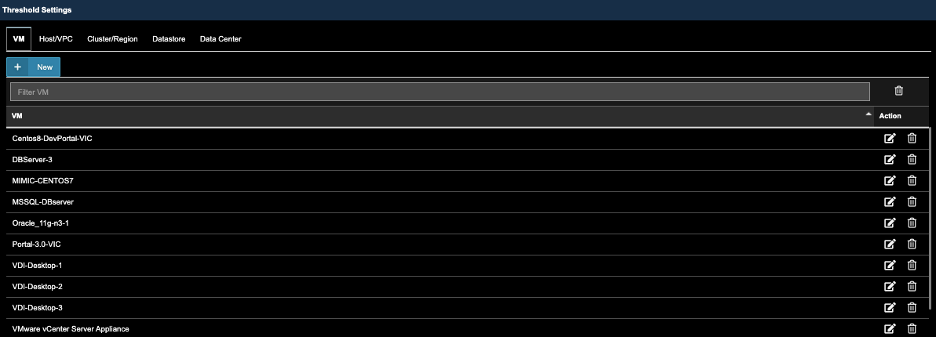
C) Use the Scroll bar, find and Select VM’s that were previously selected in Alarm Action Configuration. The click ‘Next’.
D), Click Action of the Desired ‘Stat’ Type to reveal the Threshold Settings dialog box. Enter Thresholds, then Click ‘OK’.
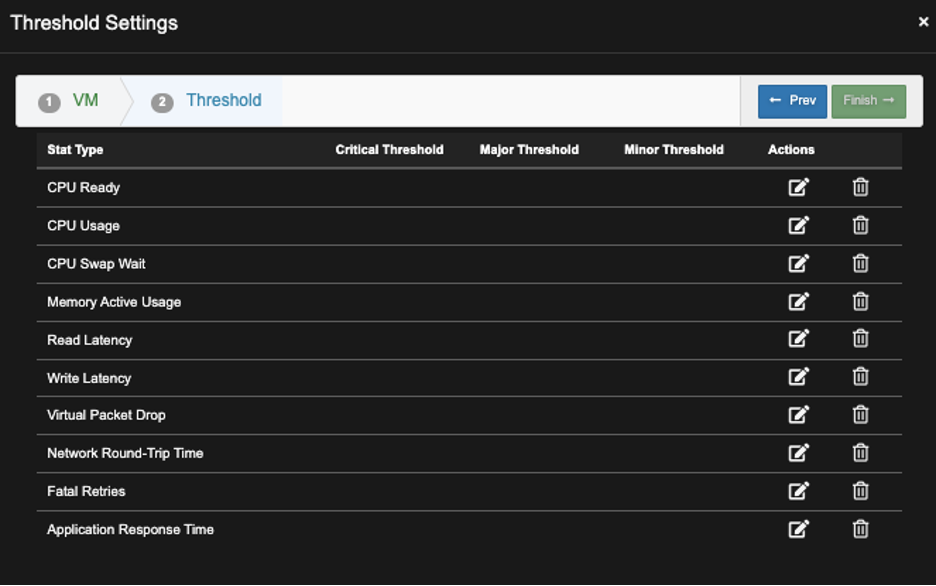
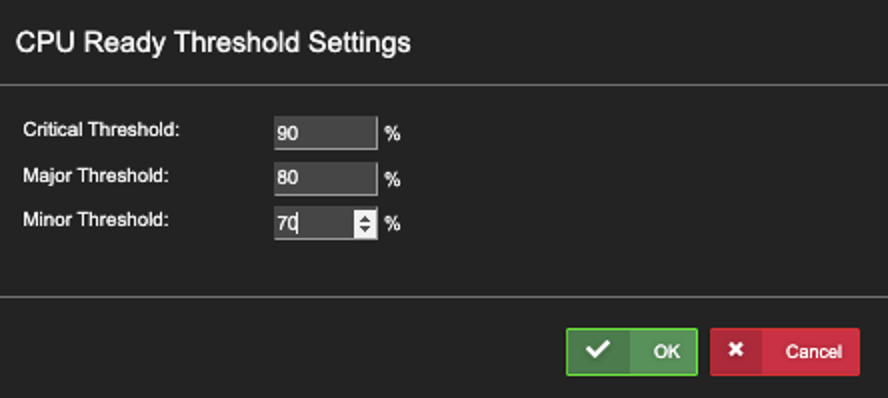
E) Screen below shows the new Threshold Setting, repeat steps above to make addition settings.
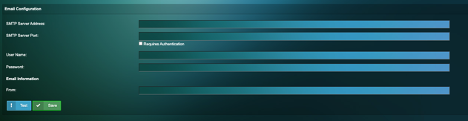
How to setup Email notifications in Uila?
1) Setting up Email Configuration server -
- On the Uila UI, go to Settings --> Global Configuration
- Under email configuration, enter the SMTP server configuration
2) Setting up Email Notification –
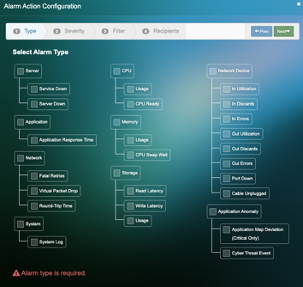
- Click on Settings -->Alarm Configuration
- Click on New Email Action
- Select the Alarm Action’s to be configured and click Next
4. Select the Alarm Severity and click Next
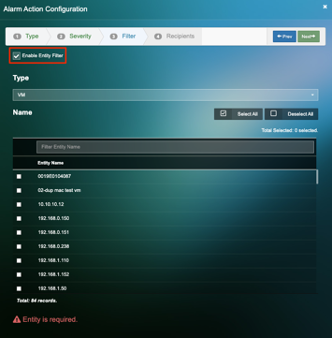
5. Under filter, if you would like to receive notifications for specific nodes, “Enable Entity Filter” and specify the VM’s or Service Groups for which you would like to receive notifications.
6. Add the recipient names and click on Finish
Note:
a) You can create as many email actions as required.
b) Separate email notifications can be created based on specific entities or alarms per user.
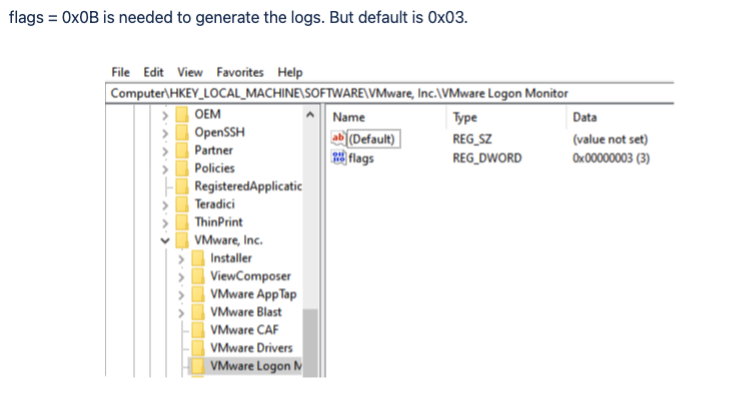
Enable logon details for VMware Horizon VDI
This needs to be applied to each of the VDI servers Golden image, so it can be executed by the VMware Agent at startup.
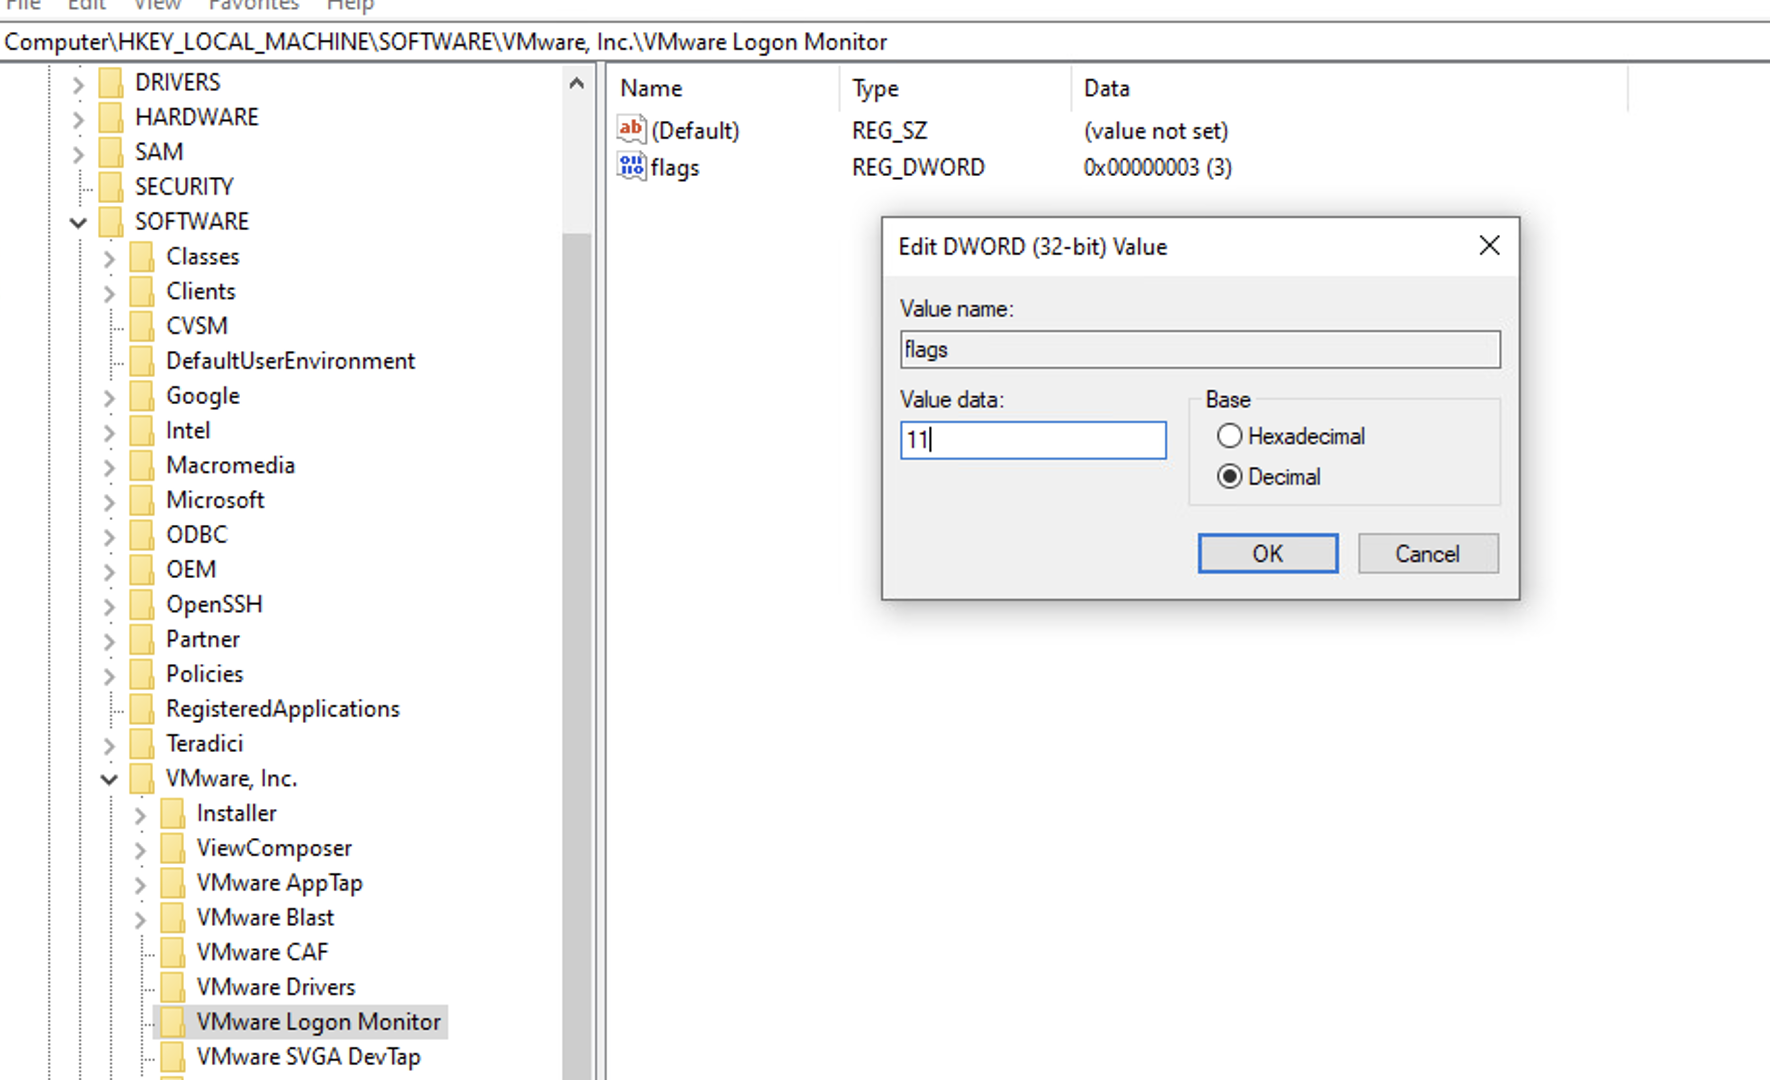
1) On the VDi server, Run regedit.exe as Administrator
2) Go to HKEY_LOCAL_MACHINESOFTWARE[VMware, Inc.VMware Logon Monitor
3) Change the key from 3 to 11 decimal (or 0x0B hex)
4) Click OK and close regedit32
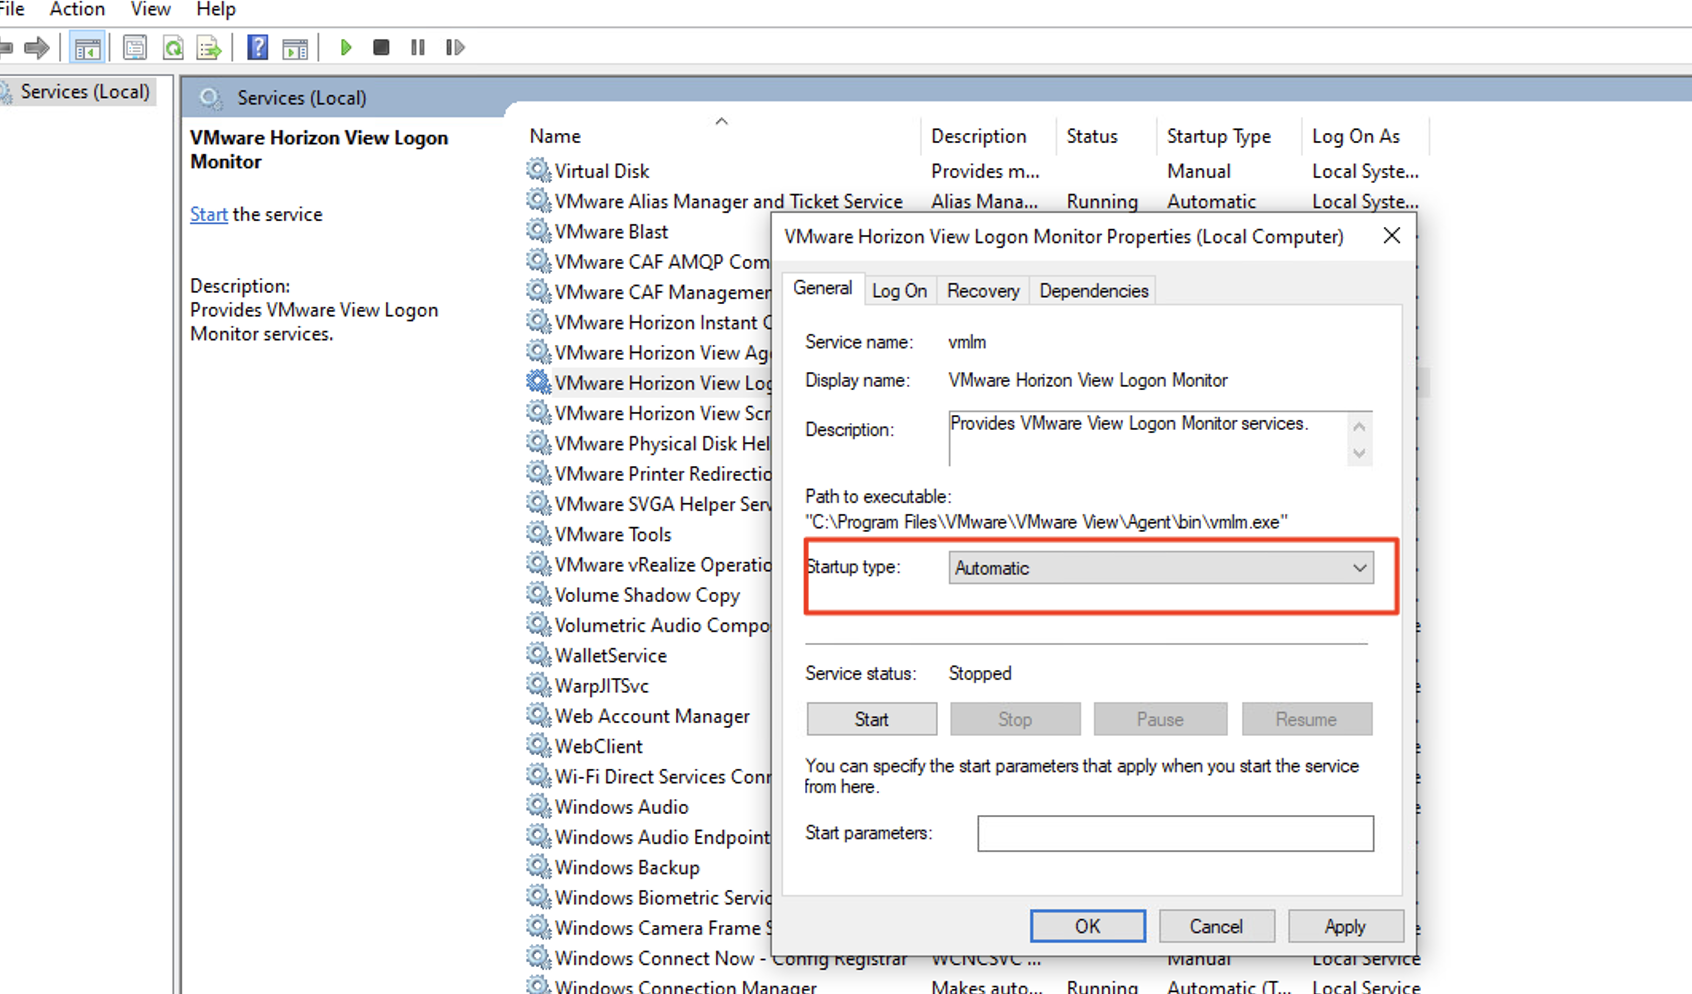
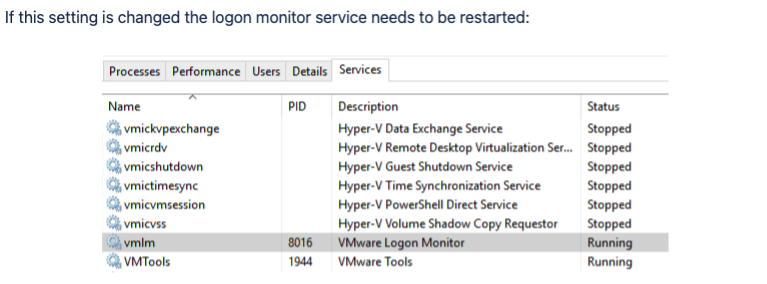
5) Run services.msc as Administrator
6) Find the VMware logon monitor executable service
7) Set it to Auto Start to make sure it starts when it boots up.
8) Save the new VM image as the new Golden image snapshot..
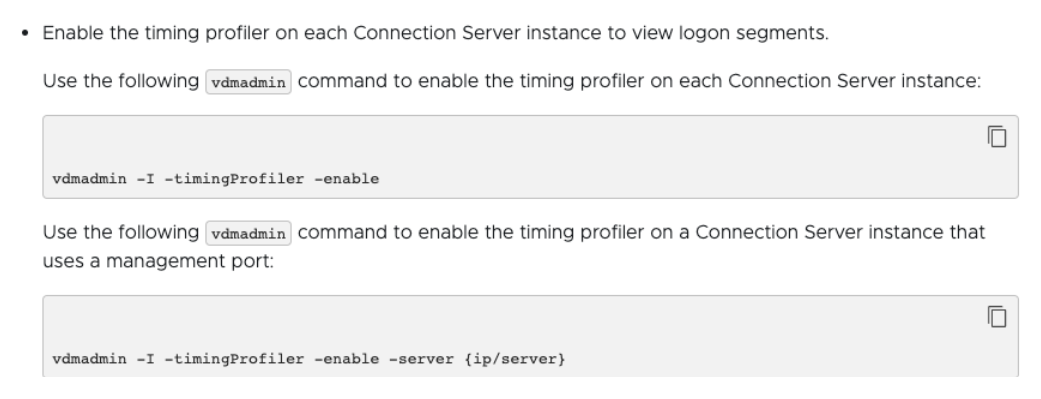
In some cases, the horizon agents still will not generate the timing. Then you will need to issue this command on the Connection Server:
To apply the license, please follow these steps:
A) Go to Settings —> Global Configuration
B) Scroll to licenses
C) Add the attached license and use the register id below:
Register ID: on-prem-your-uniqueID (Please note that the register id is case-sensitive and supplied by Uila)
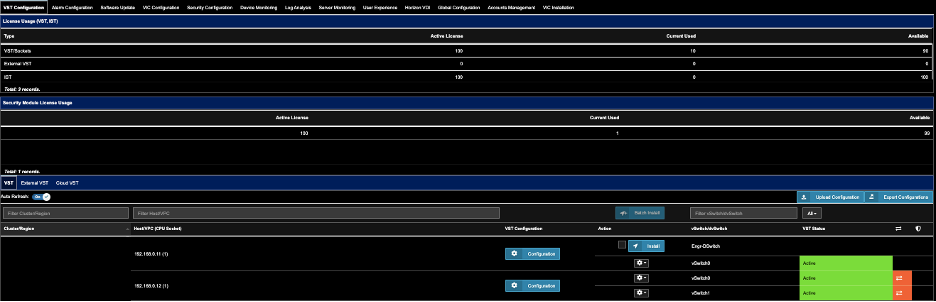
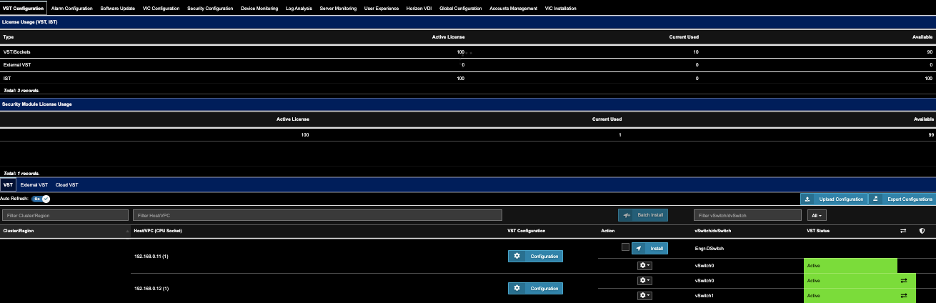
After applying the CTM license, above, enable CTM for each host.
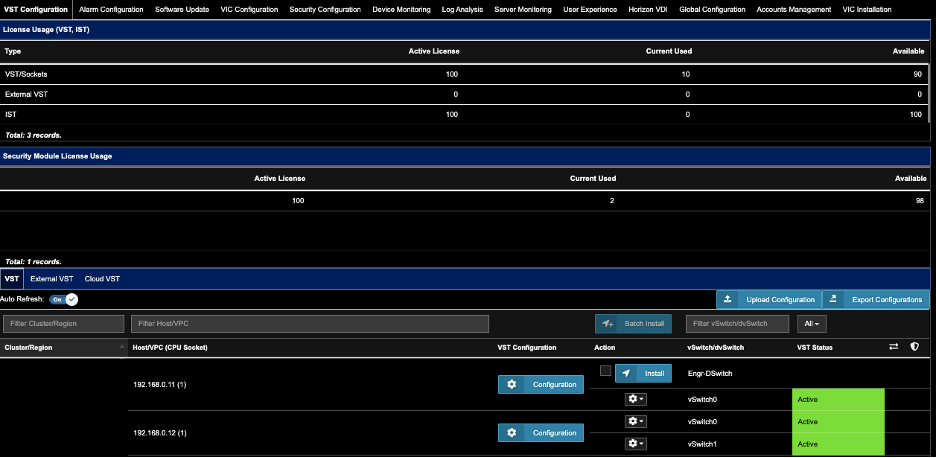
To enable CTM for a host
- Go to Settings. Select the VST Configuration tab.
- Click on the VST tab....as shown.

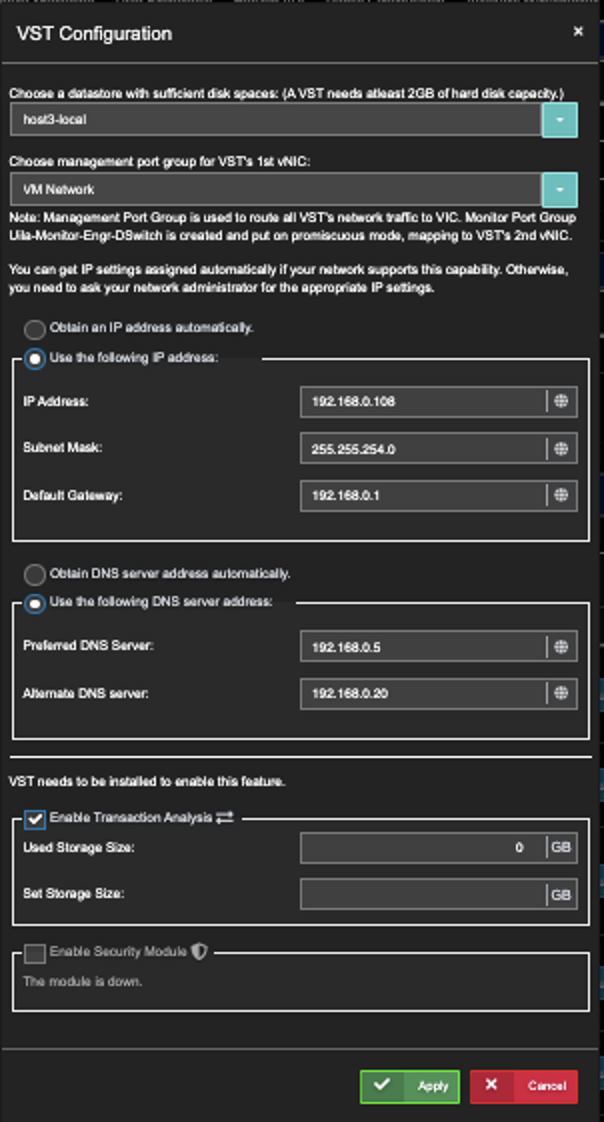
- For the Host of choice, click on the corresponding Configuration (blue button).
- While in the VST Configuration window, scroll down to the bottom.
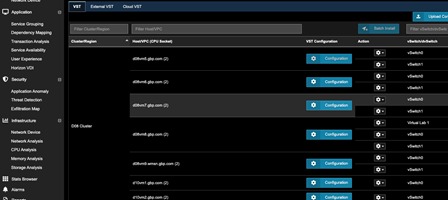
- Enable "Enable Security Module"
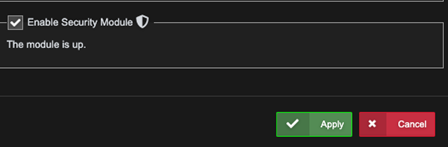
- Click Apply
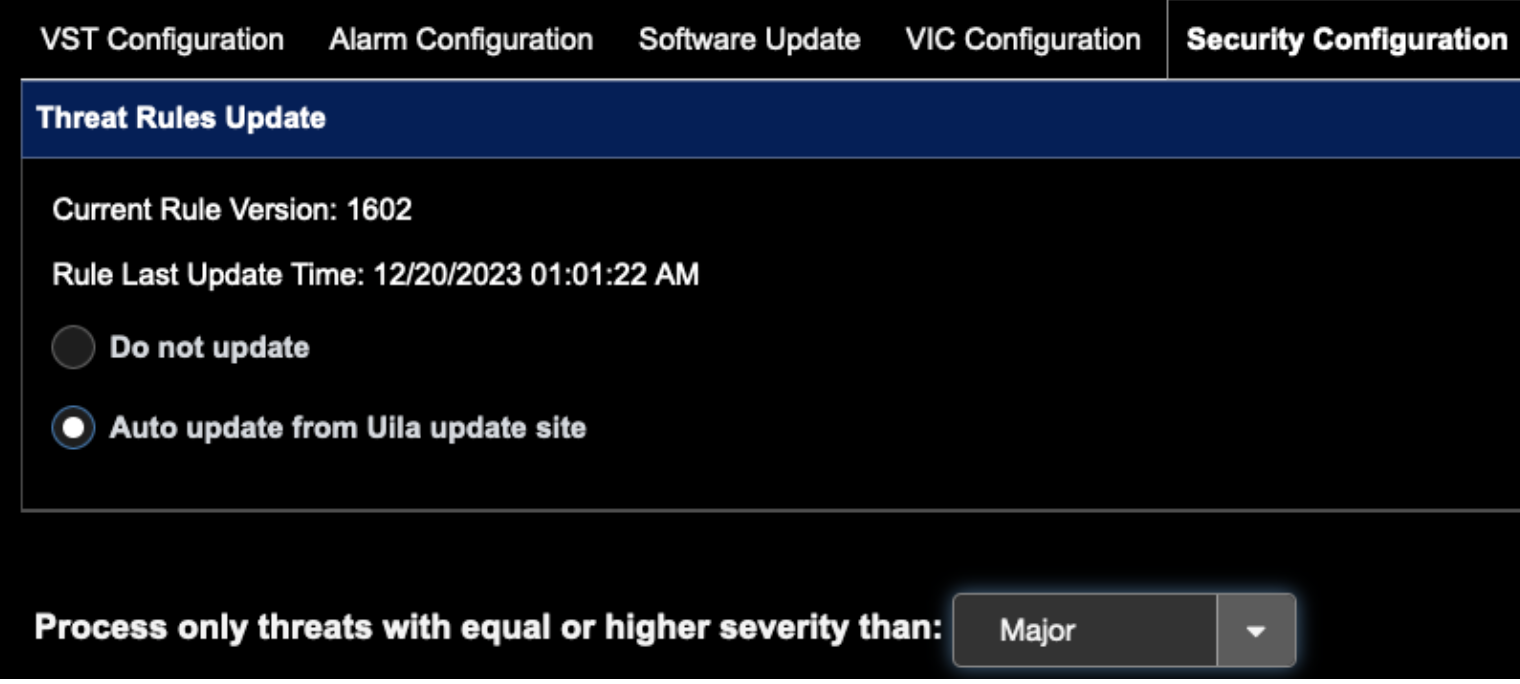
- If you wish to Threat Rules Auto update from Uila, click the button below:
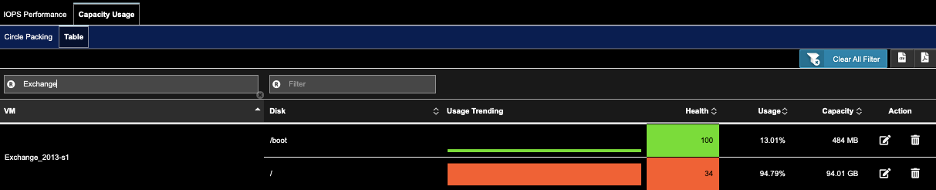
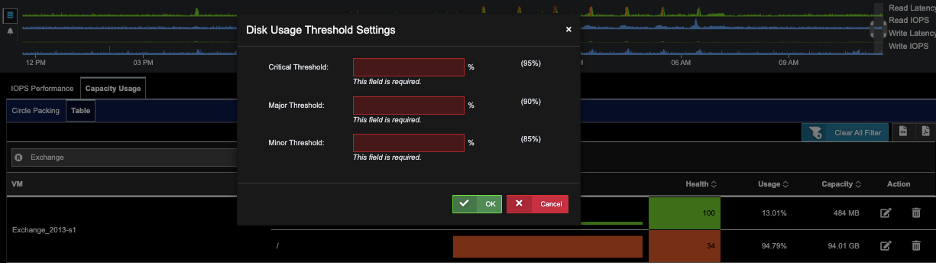
A) Go to Infrastructure->Storage Analysis.
B) Click on tab Capacity Usage. Click on sub-tab Table.
C) Enter VM name in the Filter VM search field under the sub-tab Table

D) For the VM of choice, click on the pencil icon to set the thresholds, click OK.
(Default Thresholds for Critical, Major, Minor are 80, 85, 90)

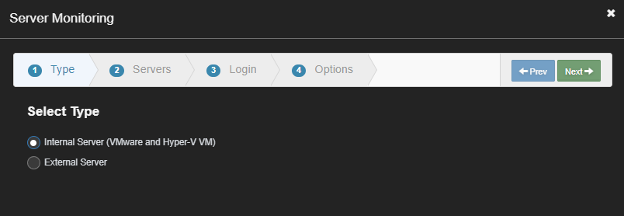
Prerequisites –
1) Ensure WMI is enabled on the external servers you are looking to monitor (For Windows only)
2) For external servers, ensure you add them manually using the steps from the article –(Monitoring Applications and Networkinn for Physical Servers link)
3) If the server is linux based, you would need to have SSH logon credentials that has access to read only commands like “top”
Steps –
1) Go to settings à Server Montioring
2) Click on “Setup Servers”
3) Click on "External Servers”
4) Select the external servers you would like to monitor
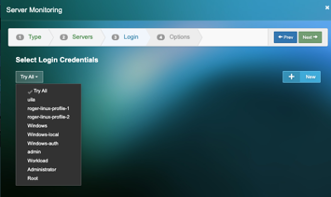
5) Click “New” to add the new login credentials and Select from the dropdown
6) Select the options that apply and hit finish –
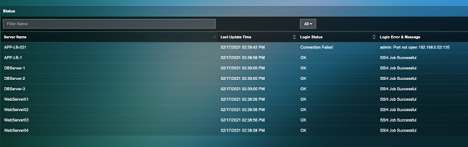
7) Wait for 2-3 mins and see the monitoring status is “Ok” or “Failed”
Uila’s External Device Monitoring feature provides the user with the ability to monitor physical servers outside the virtual environment.
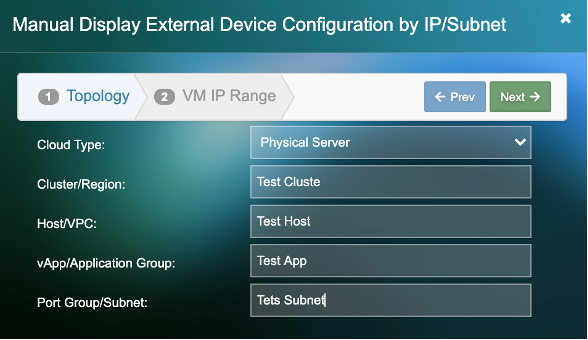
To setup external devices to monitor for Network and Application-
1) Go to settings à VIC Configuration
2) Under “Manual Display external devices, click “New”
3) Add the required external device configuration and click “Next”
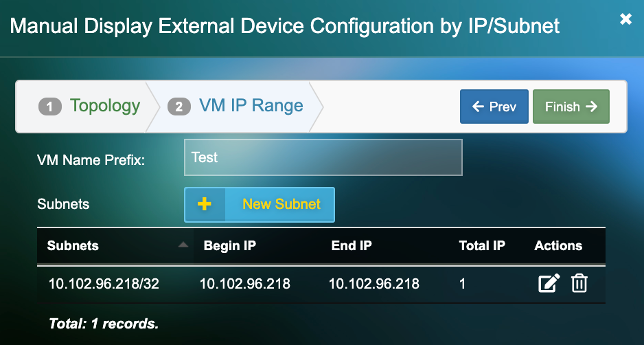
4) Add the “VM Name Prefix”. (This will be the name by which the server will be identified in the Uila UI)
5) Click on “New Subnet”. Add an individual IP or a subnet for a group of devices.
Alternatively, if you have multiple physical servers to add, them via the excel template
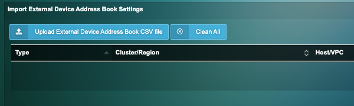
1) Create a CSV file with the fields shown below.
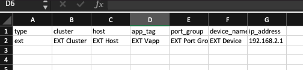
2) Enter the information including the IP address of your Physical servers
3) On the Uila UI, go to settings —> VIC configuration
4) Under “Upload External Device Address Book CSV file” upload your spreadsheet.


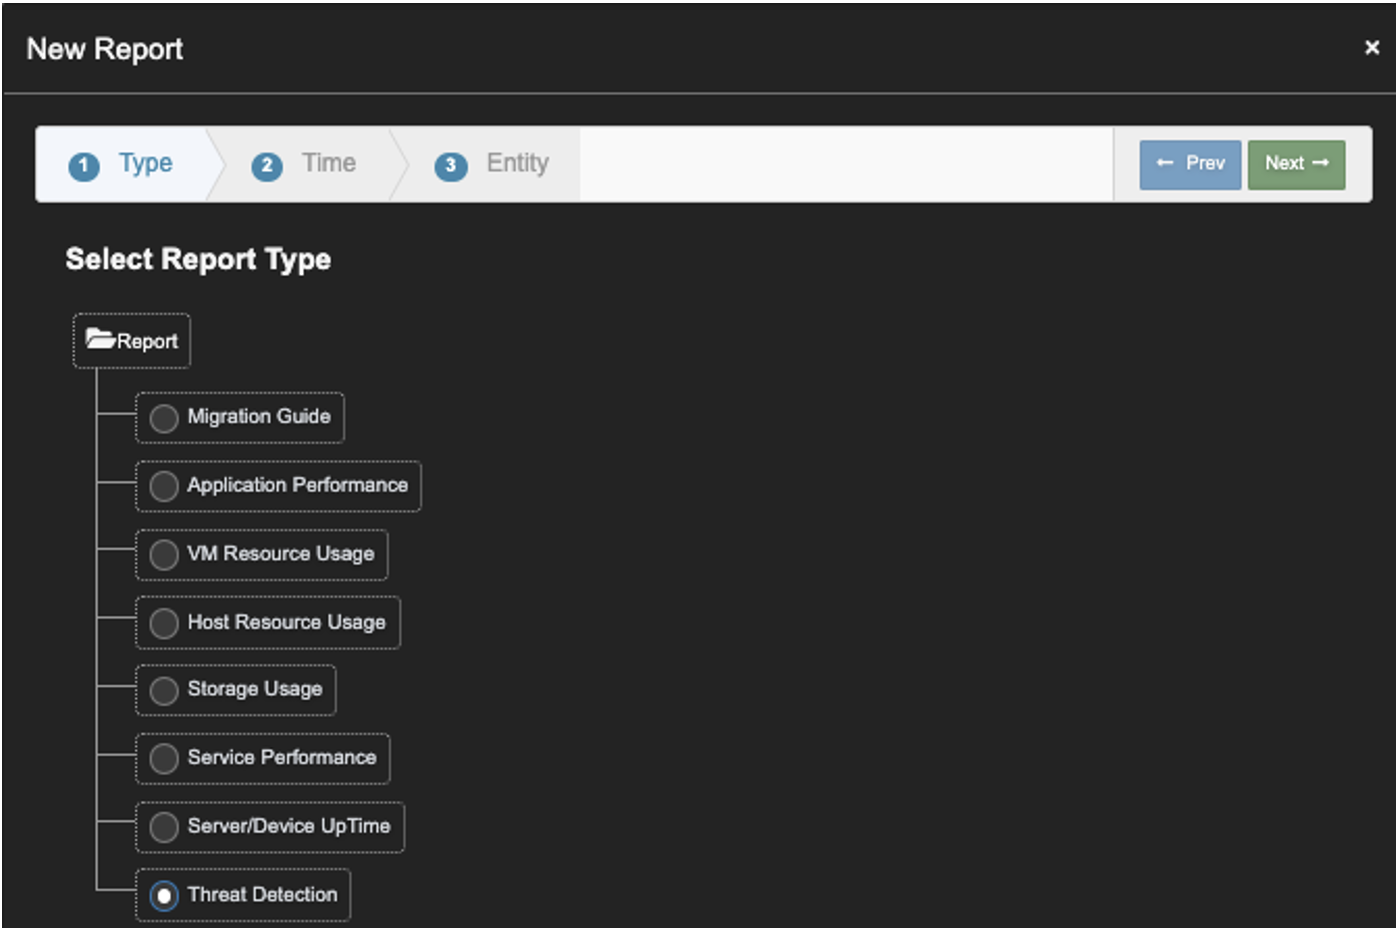
2. Click on 'New Report', Check 'Threat Detection'. Click 'Next'.
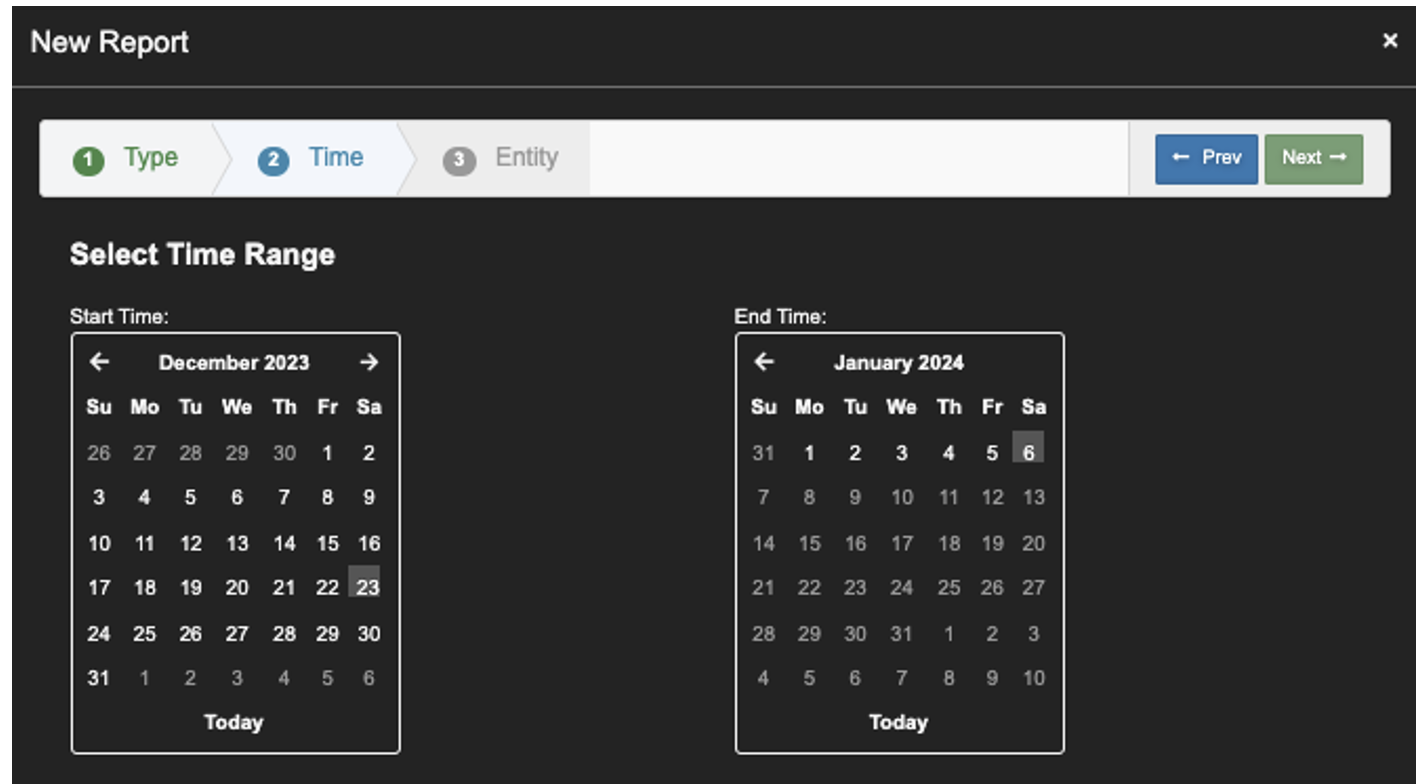
3. From the Calendar, Select the last 2 to 4 weeks. Click 'Next’.
This example; 12/25/2023 to 1/6/2024.
- Add 3G RAM to VIC VM for each Connection Server enabled.
- Add additional CPU core per Connection Server enabled, with max of 8 cores.
Changes made to the Golden Image • Make sure this registry key is set to 0x0B or 11
• Make sure the vmlm service is set as Automatic Start.
Enable Connection Server setup to allow Logon Duration In some cases, even after the above settings were applied, Logon timing still does not show up. You can try to run this command on each Connection Server.

Configuration in Uila UI
1. Go to Settings->Horizon VDI, Click ‘New’.
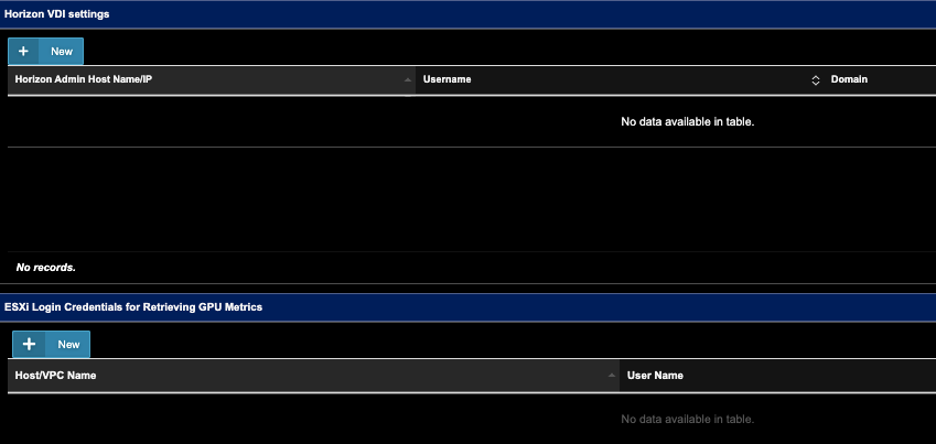
2. Enter all required fields. Check the ‘Collect Process Level CPU…..’ option if you want to get the process list. Click ‘OK’ to complete the VDI Setting.
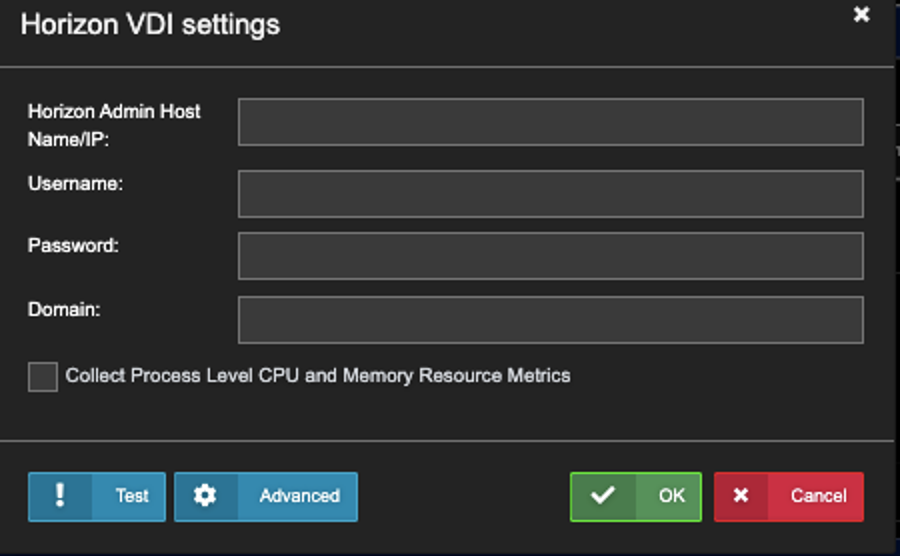
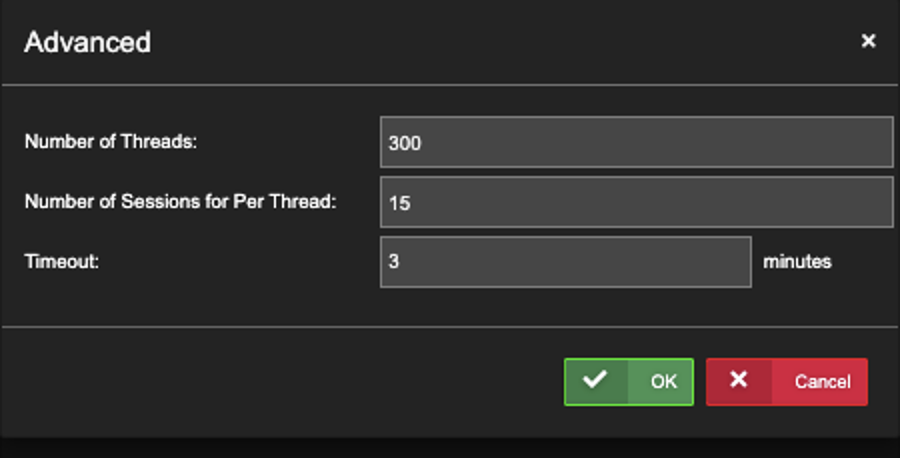
Option: Click ‘Advanced’ to see the Defaults. Part of Uila Support when there is > 3,000 VDI sessions.
2. Find the Host you wish to Turn-on Transaction Analysis, Click ‘Configuration’.
3. Wait xx minutes, until
 is shown on the right side of the Host…..
4. Wait a few more minutes until you see.
5. Repeat the same steps for other Hosts that show
 Status.

Click New to create a new entry and enter a local or Domain account that can login to that machine:
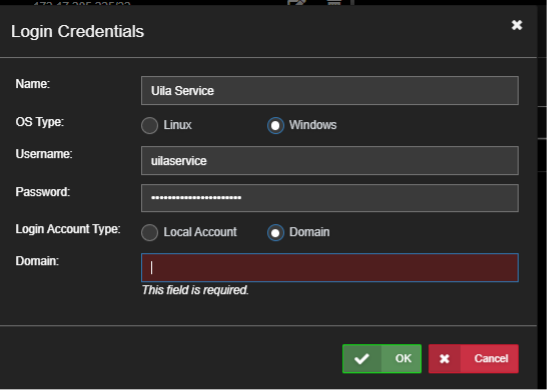
Click Ok to save. Then click Setup Servers to add a machine to monitor:
Pick a server and then select the account to use:
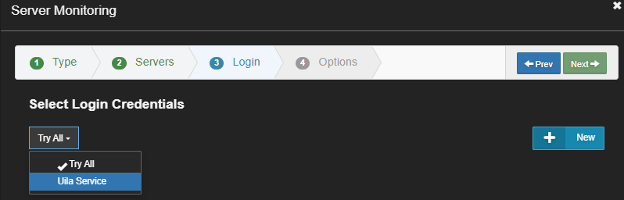
Enable the Collect Process Level CPU and Memory Metrics.
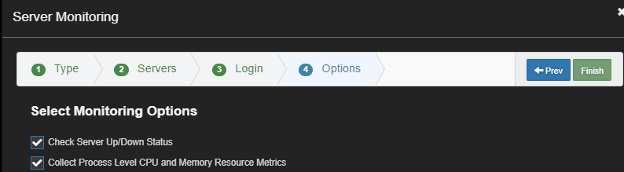
After a few minutes you should be able to see the login status and the process list.
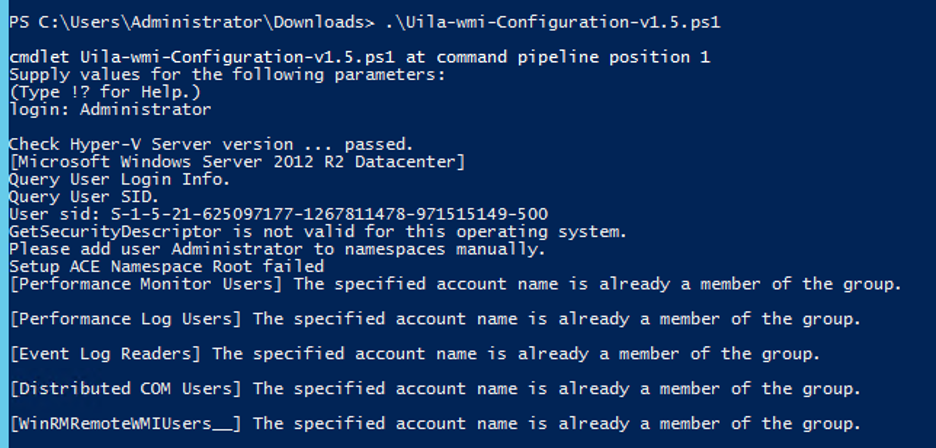
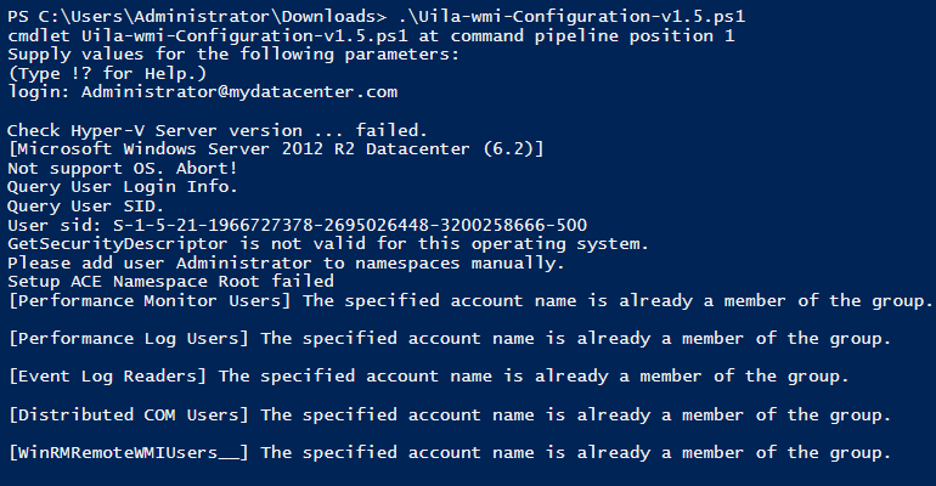
2 – If login fails you will need to Enable Permissions on the Windows machine by running the ‘Uila-wmi-Configuration-v1.5.ps1’ script on the Windows machine. Copy the Uila script to the windows machine. The script supports the use of a Local or Domain account. On each Windows Server, run the uila-wmi-configuration-v1.5.ps1 from a PowerShell window.

If permissions prevent the script from running, prepend the execution policy change:

To enable Local Account, enter the local account name: (in this example ‘Administrator’)
To enable a domain Account, enter the FQDN of the user login: (in this example ‘Administrator@mydatacenter.com’)
Check Uila status to see if the login will succeed. Generally the next login attempt could be in an hour later. To force a retry, edit the server monitoring setting and click Next, Finish.
Root Cause: Your Admin login password may be expired
Recovery Steps:
- Login to your VMware V-Center
- Reset your password.
- Login to your Uila Account
- Go to Settings –> VIC Configuration
- Select VIC Configuration Page, update your V-Center password (same one from Step 2.)
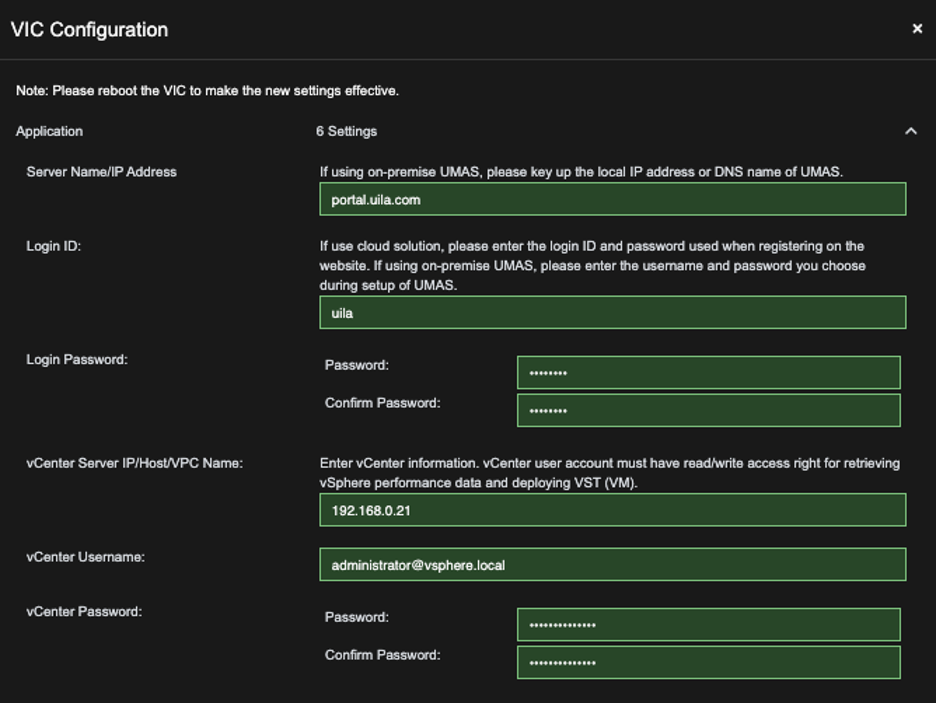
6. Wait for 5- 10 minutes, until you are confirmed that the Uila Dashboard is fully recovered. Otherwise, Contact Support@Uila.com


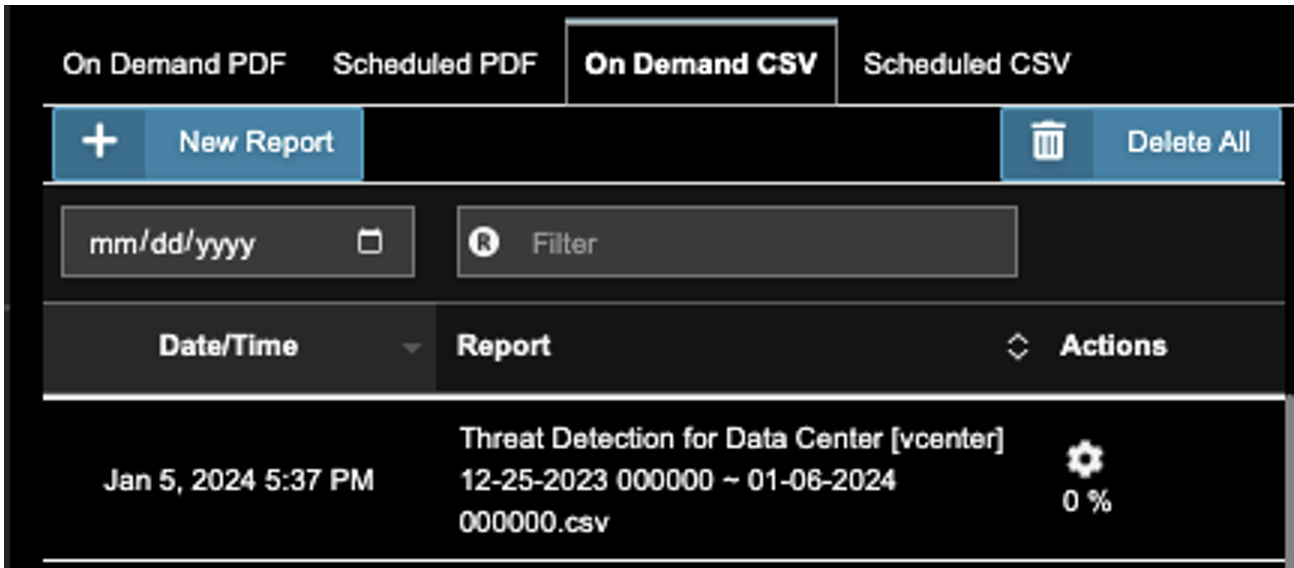
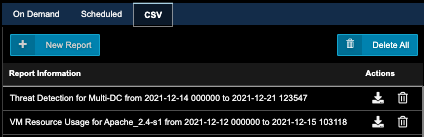
1. While in Uila, go to Reports in the left menu.
2. Click on the CSV tab.
3. Click New Report.
4. Select Threat Detection, Next.
5. In the time range, specify the range of interest. Click Next.
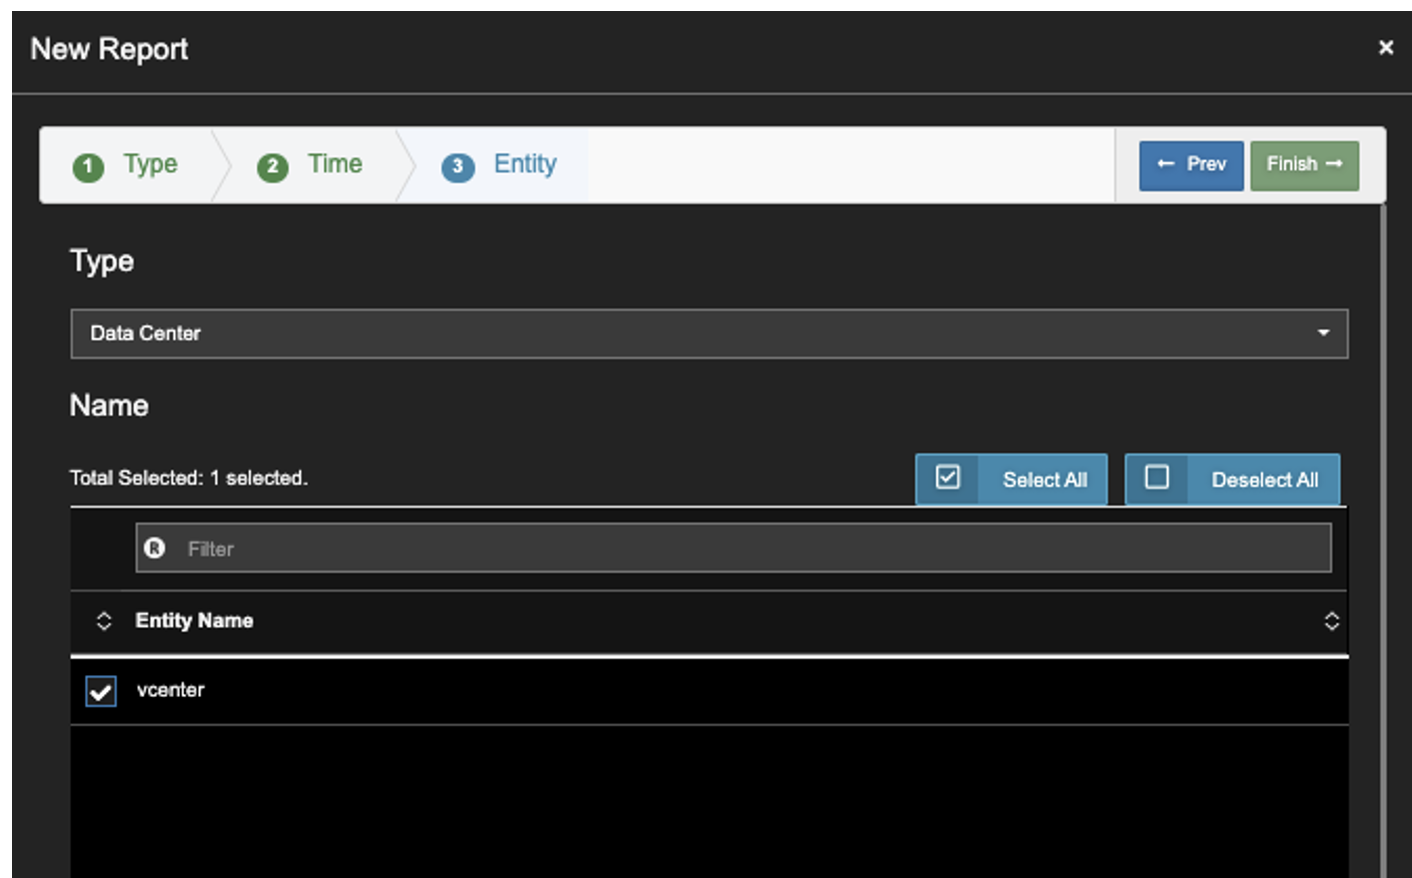
6. Select your Data Center. Click Finish.
7. After the report is generated, it will be listed in the Report Information list. Download it using the Actions->Download icon.
8. Email Report to Uila. Uila will provide a security assessment report for your review.

Uila SaaS is hosted with a well-regarded hosting company in the United States. Customer data currently resides in the United States of America and primarily in the state of California.
The hosting company tests their security systems and protocols regularly to ensure exceptional response rates, and each year participates in compliance validation programs such as ISO 27001, SOC 1 Type 2, SOC 2 Type 2, HIPAA and PCI DSS. All compliance examinations for those Data Centers are conducted by Schellman & Company, Inc., an independent, licensed CPA firm, QSA, and accredited ISO 27001 certification body by ANSI-ASQ National Accreditation Board (ANAB) and the United Kingdom Accreditation Services (UKAS).
The hosting company also directly employs experienced security officers at their facilities, who receive rigorous annual training and are required to pass certification. CoreSite data centers are protected by a gamut of technological security measures including IP-DVR cameras & perimeter fencing, Biometric SCANNERS & card readers, mantraps, locking cages and cabinets.
For detailed information refer to this document.
However, when an application exhibits slow performances, vST will capture small portion of the transaction data, e.g. IP addresses to allow application developer to analyze application issue that might be the cause of slow response time. If capture partial data is prohibited by your company’s security policy, we recommend that you select the On-Prem deployment option.


